Monthly Archives: January 2016

Teaching My Friends To Make Cards

Good morning my friends!

I’ve been making cards for several years and I love to give them out to people.  Some have said they wish hey could make cards, but find it too difficult.  So I decided to give card classes for them using a variety of stamps.

I started in the summer and I find that not only are we making cards, but we’re also getting to know each other better and enjoying a creative form of entertainment.

 For this week’s lesson, I set up all the materials for them and will show them how to put them together.

I had so much fun making this one – lots of layers and dimension, but it will take some time to put it together.

FeelBetter - Copy.jpg

I used the Now And Always stamp kit (an oldie) from Unity Stamps.  I love this kit because it has flowers that can be stamped on different colors of cardstock, and be cut apart to stack them and give them dimension.

NowAndAlways - Copy

I saw this type of card online and since I don’t have a beautiful butterly die like the one they used, I chose an older dragonfly from Spellbinders.

JustBecause - Copy

And, used this kit with that has many different sentiments and fonts!

blossomingThoughtsAndWishes - Copy

Finally, this is my favorite.

YourBest2 - Copy

I used Poppy Pattern Penny Black background stamp for this one, and the sentiment from this kit:

Butterflfies andSumbeams - Copy

One of the friends that comes to take classes prefers 6×6 cards and I usually make 5 1/2 by 4 1/4,  and so I’ve been trying to accomodate her, but the background stamps are usually 5 1/2 by 4 1/4.  I guess I’ll have to use single stamps to make the background, but it will be more time consuming.

So, if you’re in the area and want to learn how to make stamps in two hours, leave me a message on my Facebook page.

Have a wonderful day!

Carmen

Life Book Week Five – A Vessel Full of Tenderness

This week’s lesson was with Pauline Agnew who followed the theme of the fearless fun. She showed us how to create a beautiful vase of flowers using as our collage papers a map of the area we were born.

I was born in Mexico in the state of Tlaxcala – a Nahuatl name –  pronounced (Spanish About this sound [tla(k)sˈkala] ), in the city of Calpulalpan (cal pull al pan).   Don’t you just love it!  It’s almost like a tongue twister.

I googled the city and state, but it’s such a small community it was difficult to find just the right map.  So I opted to print the map of Mexico and the state of Tlaxcala.

The state of Tlaxcala is located in East Central Mexico, just east of Mexico City.

mexico-map


Google found “Cómo llegar a Tlaxcala.”  How to get to Tlaxcala.

Looking at the state, the city is in the lower left corner.  There is a big highway nearby and I think this is the one my uncle, Salvador Galindo, who was an engineer, was involved in building back in the late 1940’s .  My uncle hired my dad to be the accountant and to be responsible for paying the workers.  Wherever the highway went, we went.

According to Wikepedia, Tlaxcala is one of sixty municipalities in the state of Mexico.  My mother didn’t like the city because it was so small.  She told me that there was a big Agave farm nearby where they extracted the juice from the center of the plant, called Pulque, with an elongated gourd used as a tube.  She told me a friend talked her into trying a sip, but she became sick to ther stomach because all she thought about was that the sap was sucked out with a tube and there must have saliva in it.  Ugh!!  Well, later she found out the reason why she got sick and that is because she was pregnant with me and everything she was eating made her want to puke!

mapa-de-tlaxcala-como-llegar

I also found out that Tlaxcala was one of the places Hernan Cortez passed through on his way to Tenochtitlan, the capital of old Mexico.  The inhabitants of that area, the Totonecas, were fierze enemies of the Aztecs and joined Cortez in the fight against them in his conquest.

Now on to my project!

First thing I did was cover my 11×14 watercolor paper with different brush strokes of acrylic paint, keeping in mind that it was going to be a bouquet of flowers on a vase.

first stage.jpg

I then collaged pieces of my maps and covered the paper with more strokes and several more layers of paint later, this emerge, but I wasn’t done yet.  I did manage to leave a piece of the map with the name of my birthplace showing on the vase.  I used some primary colors and a bit of gold.

secondStage.jpg

Then after several more strokes and stencils, I finished my creation.  It is not as abstract as it was meant to be, but I did enjoy the process!

finished

Here is a close up of the bouquet and the vase,

Tlaxcala

and the leaves

detailLeaves

…and one more close up of the middle of the flowers,

closeup

I’m calling this project done!

Thanks for visiting and I appreciate your comments,

Carmen


Life Book Week Four And Dina Wakley

Fearless Art With Annie Hamman

This lesson was a lot of fun since I allowed my inner child to come out and play and make a mess on my art.  It really took me out of my comfort zone, but I was able to let it go and I didn’t spend too much time trying to make it perfect.

Annie had the collaboration of her four year old daughter, Tallulah.  Actually, Tallulah has been collaborating in her mother’s work since she was a year old when she would go into Annie’s workshop and try to mess around.  After several attempts at getting her to stop “bothering” her, she decided to allow her daughter to play along with her and as a result there’s been sensational pieces of art created by both of them.

I first took a face from a fashion magazine and made my sketch.  I chose this one because the features were very detailed, although I left the glasses off.

Model

Then I stared adding the acrylic paints and worked on it for a while.  This is the first few layers.  I used a few stencils and added lots of color to her hair.  This piece of art went through several changes as you will see because my “inner child” wanted to change things and I allowed her.

FirstOne

Then, the inner child came out to play.  She wanted feathers in her hair and apparently she didn’t like the hair so she put in different strokes even over my pretty flower stencil.

Number2

So I went back and added another big flower on her hair.  My inner child came back and used more stencils and more paint, and then I decided that was enough out of her.

Before2

I went back and just changed the stencils and hair and worked on her forehead a bit and gave her new eyebrows and eyes with eyelashes even!  I also used a stamp and a white jelly roll pen to give her a few gray hairs and added details to the flowers and leaves. I left the collaged butterflies on her neck and on the top. I’m really happy with her and I hope to play like this once more.

FearlessFinal

That is it for this lesson and I’m so looking forward to next week.  So many people have signed up for Life Book 2016 that it’s hard to keep up on our secret Facebook page.  I love all the different interpretations and the art work is amazing.  There have been some beautiful, beautiful, pieces shared that intimidate me, but I have to keep thinking about the word I chose for this year “Beautiful.”  Everything I create is beautiful!

Art Journal Color Courage with Dina Wakley and Amy Jones

I’ve been meaning to post some of the backgrounds I’ve been creating after watching Dina Wakley and Amy Jones in the Interweave Store through the Cloth, Paper, Scissors. Shop.

I bought her book,  Art Journal Courage, through Amazon and I was hooked!  There is nothing like seeing the artist at work that’s why I decided to buy the videos.

She is truly fearless when it comes to playing in her journal.  I bought her bird stamps while they were on sale at the JoAnn’s online store.  Now I can’t wait to use them on the backgrounds I created.

This background was mostly created with ink sprays and stencils.  She has a great line of stencils, but I made my own and used some I had on hand.

These were also created with spray inks, but she introduced acrylic paints too.  To me it looked very busy, but I have to go back and finish watching the video so I can see how she fixed it.

 These were created on deli paper.  It’s amazing to me that I didn’t have to use my Gelli Plate, but I’m sure in one of her classes she’ll take it out to use it!


And Finally, the piece de resistance (spoken  with a French accent).   These were my favorite pieces because the colors are just so vibrant!  I used the sprays on the bottom and the stencils on top.


Now, to watch the rest of the videos and see how I can use my new sketchy bird stamps.  Thank you all for stopping by today and I look forward to your comments.

 Until next time, play, play play!~

Carmen

Life Book 2016 – Week Three

Week Three with Melody Ross

Your Sacred Box of Wisdom

Melody Ross and her sister have helped a lot of women all over the world to find a supportive sisterhood by means of symposiums through the Brave Girls University.  Please check out Melody’s blog – The Brave Girls Club.

This week’s lesson with Melody Ross was about getting in touch with all the wisdom we have accumulated in our life just by living, being, and doing.

The exercise was very deep in that we would write down the wisdom in our life and how we came to that wisdom by our experiences, whether good or bad, and what we learned from them.

I chose instead to create a project with a box full of books where I have found wisdom.  Books like The Bible, the Book of Life, and books written by other influential people.  I appreciate all forms of wisdom and I celebrate by sharing some of the words with you that I find have helped me grow and heal my life.

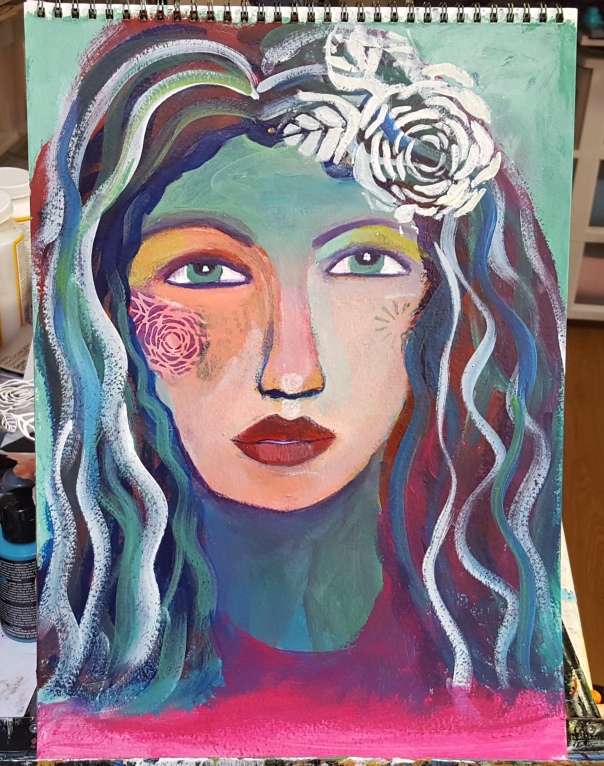
This time I made a girl with a different hairdo than what I usually create.  I started out with an 11×14 watercolor page and after coloring the page and the girl,  I then created the background by collaging with a napkin that had the same colors.

I first drew her with a big smile, but I couldn’t get her teeth right.  She looked like a hillbily, so I opted to give her some smile marks around her mouth.

WisdomFull.jpg

In order to do this project, I did some research on the word Wisdom.

Wisdom is the ability to think and act using knowledge, experience, understanding, common sense, and insight.”

You can see I titled some of the books – Life, Expriences, Holy Bible, and one of Maya Angelou’s biobraphical books – The Heart of a Woman.  I couldn’t include all the books and all the authors who have inspired me so much in my life.  I would have loved to have included some of the inspiring quotes I love, but I would need many, many more pages.

The box is also collaged with a napkin and outlined with a marker.

BoxofBooks.jpg

I did, however, include a couple of quotes from the Bible.  On the top is from the Book of Proverbs, “Widsdom is the most important thing, so acquire wisdom.  And with all you acquire, acquire understanding.”  (Proverbs 4:7)

The title of my page Wisdom is from an image I found on Google.  Here you can see a closeup of some the words that have to do with acquired wisdom.

Wisdom.jpg

The second quote is also from the Book of Proverbs:  “Happy is the man (or woman) who finds wisdom.  And the man who acquires discernment.”  (Proverbs 3:13)

20160114_163938

Before I close, I want to share some quotes about Wisdom I found while doing my research.

Enjoy!

“The desire to reach for the stars is ambitious. The desire to reach hearts is wise.”
Maya Angelou

“It is better to remain silent at the risk of being thought a fool, than to talk and remove all doubt of it.”
Maurice Switzer

“Yesterday is gone. Tomorrow has not yet come. We have only today. Let us begin.”
Mother Teresa

“No one can make you feel inferior without your consent.”
Eleanor Roosevelt, This is My Story

“Knowing yourself is the beginning of all wisdom.”
Aristotle

“The only true wisdom is in knowing you know nothing.”
Socrates

“The saddest aspect of life right now is that science gathers knowledge faster than society gathers wisdom.”

Isaac Asimov

“Turn your wounds into wisdom.”
Oprah Winfrey

“Any fool can know. The point is to understand.”
Albert Einstein

“The simple things are also the most extraordinary things, and only the wise can see them.”
Paulo Coelho, The Alchemist

“By three methods we may learn wisdom: First, by reflection, which is noblest; Second, by imitation, which is easiest; and third by experience, which is the bitterest.”
Confucius

“Knowing others is intelligence;
knowing yourself is true wisdom.
Mastering others is strength;
mastering yourself is true power.”
Lao Tzu, Tao Te Ching

“Knowledge speaks, but wisdom listens”
Jimi Hendrix

“Yesterday I was clever, so I wanted to change the world. Today I am wise, so I am changing myself.”
Rumi

“Honesty is the first chapter of the book wisdom.”
Thomas Jefferson

“Authority without wisdom is like a heavy axe without an edge, fitter to bruise than polish.”
Anne Bradstreet

“We must live together as brothers or perish together as fools.”
Martin Luther King Jr.

“Sometimes it’s not enough to know what things mean, sometimes you have to know what things don’t mean.”
Bob Dylan

“Lost Time is never found again.”
Benjamin Franklin, Poor Richard’s Almanack

Until next time, my friends, think and act wisely.

Carmen

Life Book Week Two

Bonus Lesson With Ivy Newport

Patch It Up – Make it Shine

This was an amazing lesson, and at the same time very frustrating for me.  We had a similar lesson last year, but we collaged the main image’s hair, face and dress.

We began with a short writing exercise about what we want to leave behind in 2015.  Whether it be fears, anger and other things that limit our creative process.  I cut out some images from magazines as well as words I wanted to highlight in my journal and pasted them on top of the writing to keep it secret.

I used an 11×14 watercolor paper and then chose a color palette to work around the image . Ivy does a superb job, but I’m still working on blending the paint around the girl’s face.

The purpose of the image and the words was to incorporate them into a representation of our intentions and goals for 2016.  We added metalic paint and glitter  at the end to illuminate our creation.

I took a long time going through magazines looking for just the perfect image of a girl, the background, and the words to go along.  I found a page in a fashion magazine of Greek columns and the models sitting around in various poses and that is what I used for my background.

I finally found a picture of an actress in another fashion magazine with a contrasting color palette.

This was my plan before I started gluing everything down.

My plan was to have a heading with New Year New You and how to achieve it, but I ran out of space because I wanted to add more words.

setUp.jpg

So instead, I made the quote “it starts with a dream…” and then Make IT Happen,” followed by having a Game Plan.  The first thing would be escape from the past and ignite the moment and stay forever strong.

ItBegins.jpg

Since the word IT was in turquoise, I added that color to the background and the columns to make it more cohesive.

RtCorner.jpg

Here is the left hand side column I fell in love with.  I didn’t have the whole column running across the top of the page, so I used my acrylic paints to add another column to the top and a floor to the bottom.

Column.jpg

Since we’re to make our project shine, I added some vines with metalic gold acrylic to the columns on either side.

StenciledColumn.jpg

I’m still working on incorporating the paint to the gir’s face in the color pallete I chose, so instead of the colors Ivy used, I chose more earth tones.  I applied clear gesso on her face, but when I started using the color pencils after the gesso dried, the gesso came off so I stopped after I outlined her features.

girlDetail

In this corner I used a lighter color of her skirt to blend in the background.  I like how the arms and hands came out after I outlined them.

LeftCorner

And, finally here is the completed collage after adding metalic gold acrylic paint around the words and glitter around her face and several other places in the background.

ItBeginsWithADream.jpg

I really enjoyed the process in this one eventhough I got a little frustrated when I was doing her face.  But I am not going to let the inner criticto rob me of the joy of creating this piece.

Bonus Lesson with Tamara Laporte

“This year I’m letting go of…”

This was so much fun!  I zentangled the butterfly after I applied several coordinating color sprays.  I also used a stencil and sprayed color through it as well as use the negative to add texture.

ButterflyWhole2.jpg

After I drew the butterfly, I sectioned the wings and added zendoodling in black and a bit of while on the left hand side that portion was very dark even after I lightened the butterfly to make it pop.  I started zendoodles or, zentangles as they are also called, about five years ago and found the process of the repititive pattern very relaxing.

Butterfly.jpg

After the butterfly was completed, I then drew a flight trail and wrote some of the things I want to let go of.

The butterfly flying toward the sun is very symbolic, indeed, because it signifies what I’m striving for in 2016.  Once again, I used the beauty to remind me that everything has beauty even the things we want to let go and the things we want to achieve.

Sun.jpg

I hope you enjoyed looking at this week’s interpretation of the bonus lessons we were presented with.

I wonder what Week Three has in store for me.  We just have to wait and see.  Until then,

keep creating and having fun my crafty friends,

Carmen


And It Begins: Life Book 2016

Hello again, crafty friends!

I put together my projects for Life Book 2015, but there were so many pages, I had to make two albums.

I made the covers out of hard white mat board and covered them with the designer paper.  I didn’t want to make holes in my pages, so instead, I made some corners where the pages would be inserted, and glued them to the 11×17 paper I found at JoAnns.

PuttingTogether

This is when I found out I couldn’t put any more pages in the album even though I used three inch rings.

Binder

As you can see, I made a lot of art last year!

Pages

Life Book 2016 – Week One

Now, I start on Life Book 2016.  I’ve been working on my projects as fast as I  can so I don’t fall behind.  This year I want to conscientiously make all the projects because I’m still learning and I’m finding what I like.  I don’t want to get into a rot, so I feel that if I try all the different classes, I can learn new styles and more techniques.

The Warm Up

Tamara Laport, the genius behind Life Book has been conducting this series since 2012.  This will be my second year, and I enjoy going to my craft room and playing with all my crafty stuff.  I’ve also been able to take out different tools, paints, and stencils I haven’t used before.

Tam, is a very gentle, gracious, and giving person.  You can tell by her lessons and the details in each that se really enjoys teaching others what she knows.

The first week she did a warm up lesson about our word for the year.  I am struggling with overworking my art and so I figured that imperfection is better than getting frustrated.

ImperfectionIsBeauty

A closeup of the lotus:

I used a variety of stamps to make it imperfect.

Imperfection

I stamped the word beautiful and the lotus with a Unity Stamp kit.

Beautiful

These two are also part of the kit.

EverythingBty

YourBeauty

Main Lesson, Happy Traveler.

I chose a lamb and an eagle to be my traveling companions.  I gave the eagle a little bit of attitude!

HappyTraveler3.jpg

A closeup of my little lamb.  Yes, she’s blue, but she’s happy.

Lamb3.jpg

A closeup of the eagle leaning on the tree.

girlTraveler.jpg

A closeup of the the traveler’s face.  Notice the doodling I did on her hair to add some dimension.

Face.jpg

I also did some doodling on the bottom left corner with a white marker and other doodles with the black one.

Doodling2.jpg

And used a stencil on her cape and on the upper right hand corner.

Corner.jpg

Tam added a pouch to her traveling companing, but I didn’t add one to mine because I fuzzed too much over my lamb and I just wanted to finish.

I’ve been working today on Week two, and will post the homework tomorrow.

Until then, happy crafting!

Carmen

New Year, Old Traditions.

Hello, my dear artsy friends.  I hadn’t been able to post because my internet was down.

I had a wonderful winter break with my family making the traditional tamales.

My sisters-in-law made all the ingredients – cooked two pork roast, then shredded them, roasted the red chile pods, ground them, and squeezed the sauce out with a sieve to achieve a velvety liquid.  Then the head of a pig was cooked until all the meat fell of the bones.  This is the part that groases me out but it gives the best taste to the filling! The shredded pork and the chile sauce were combined to make a delicious filling.

In the morning of the “Tamalada” we had all the ingredients ready except for the masa which had to be prepared.  My husband volunteered to kneed the 40 pounds needed to make tamales for the whole family!  For one batch of 20 pounds, he combined 30 Tbsps of baking powder, a medium container of melted lard, and salt to taste.  After he kneaded the masa he had to go take a nap because he was exhausted, LOL!

ArtKneeding

That’s me in the foreground enjoying the first batch!

20151230_130608[1]

My sisters-in-law, preparing the red chile and shredded pork.

The corn husks were soaked in hot water and we were ready to go.  Four women trying to make tamales their way – yeah, a lot of fun!!

I used a small palette board to pick up the masa and spread it on the softened corn husk, then a big tablespoon of the filling was added to the masa and the husk is wrapped it around it.  Now, they’re ready to be stacked up on two genormous tamale pots.  They only take an hour to cook.

We ended up making 20 dozen  of red chile, and 10 of green – and believe me, we are still eating tamales for breakfast, lunch, and dinner!

Here’s the recipe, if you want to make your own tamales:

Ingredients:

Pork Shoulder, pork butt, or loin. Boneless is best but more expensive. Cook over low heat and add garlic cloves, salt, onions. Trim any fat, and shred.

Well kneaded masa: for a 4 pound bag of Masa Para Tamales* use
3 tablespoons salt
3 tablespoons baking powder
3 tablespoons of salt

1 pound of lard melted.  Or you can use the broth from the pork shoulder.

*SKIP this step by buying Masa Preparada (prepared dough) from a Mexican grocery store or bakery. One pound of masa is enough for half dozen of tamales-30 lbs is 15 dozens of tamales.(Masa is that stuff that looks like mashed potatoes in the photo. Should be creamy or fluffy will spread well on the husks – ojas).

Chile sauce: It is worth it to make your own, but a little time-consuming and messy.  We use several bags of dried Ancho chiles.  This is the process:  Remove stems and seeds, soak them and garlic cloves for 30-45 minutes in 3 cups of hot water. Place all in a blender with two cups of the water, give it a whirl, and add salt. Run it through a sieve to remove the large pieces of dried chile.  Heat two teaspoons of vegetable/olive oil into a large saucepan, add two teaspoons of flour into the hot oil and stir until browned. Add the chile from the blender. Simmer until thickened. Add the shredded pork meat into the chile. Let it simmer together for 30 minutes or so.

Corn husks or ojas. Remove the cornsilk and soak them in a large pot of warm water until soft. Costco, Ranch Market here in El Paso, and most Mexican supermarkets have these dried in packages.

There’s lots of YouTube videos that show you how to make tamales.

Or, you can buy them at a Mexican grocery store and save yourself a lot of time and frustration.

There are more pictures on my Instagram account here:  Instagram

Stay tuned for my first project for this year for Life Book 2016.

Thanks for visiting,

Happy eating!

Carmen